| 일 | 월 | 화 | 수 | 목 | 금 | 토 |
|---|---|---|---|---|---|---|
| 1 | 2 | 3 | 4 | 5 | 6 | 7 |
| 8 | 9 | 10 | 11 | 12 | 13 | 14 |
| 15 | 16 | 17 | 18 | 19 | 20 | 21 |
| 22 | 23 | 24 | 25 | 26 | 27 | 28 |
- 프레임워크
- 백준
- cleancode
- spring boot
- Java
- 데이터베이스
- framework
- ES
- 자바
- 코딩
- 알고리즘
- 개발
- 개발자
- Elasticsearch
- 엘라스틱서치
- 코드
- API
- 그리디
- kotlin
- 애자일기법
- 그리디알고리즘
- 클린코드
- 애자일프로그래밍
- 읽기쉬운코드
- 코딩테스트
- Baekjoon
- JPA
- 스프링
- Spring
- database
- Today
- Total
튼튼발자 개발 성장기🏋️
#6 : AOP (Aspect Oriented Programming) 본문
java를 공부했다면 OOP(Object Oriented Programming : 객체지향 프로그래밍)에 대해서 공부했을 것이다. AOP는 Aspect Oriented Programming으로 직역하면 관점지향 프로그램으로써 어떤 프로세스에서 어느 시점을 바라보고 있느냐에 따라 다르게 프로그래밍이 되는 것이다. 어렵다. AOP가 나온 계기를 살펴보자.
우리는 개발하다보면 항상 공통적인 기능이 많이 나온다. 이런 기능을 하나로 묶기위해 상속을 사용한다. 하지만 다중상속이 불가능하고 코어기능과 공통기능이 섞여있는 등 효율성이 떨어질 수 있다. 이러한 문제점들을 보완하여 나온 것이 AOP이다. 코어 기능과 공통 기능을 완벽하게 불리시켜놓고 코어 기능에서 공통기능이 필요할 때마다 가져다 사용하는 방식이다.
spring AOP기능에 대해 다음과 같이 용어가 있으니 참고하자.
- aspect : 공통기능
- advice : aspect의 기능 자체
- jointpoint : advice를 적용해야 하는 부분
- pointcut : jointpoint의 부분으로, 실제 advice가 적용된 부분
- weaving : advice를 코어기능에 적용하는 행위
AOP는 proxy를 사용한다. 우리가 알고있는 proxy server 뭐 이런게 아니라 그런 역할을하는 중간매체를 사용한다는 것이다.

proxy한테 공통기능을 요청하면 proxy에서 정의된 공통기능을 수행하고 proxy로 되돌아와 남은 공통기능을 마친다.
AOP 구현 방식은 두 가지가 있다.
1. XML 사용하여 AOP 구현
public static void main(String[] args) {
	String config = "classpath:appContext.xml";
	AbstractApplicationContext appContext = new GenericXmlApplicationContext(config);

	try {
		Score score = appContext.getBean("score", Score.class);
		score.getScore();

	} finally {
		if(null != appContext) {
			appContext.close();
		}
	}

}
public class Logger {
private String prefix;
private String postfix;
// ...
public void log(String message) {
System.out.println(prefix + " [" + message + "] " + postfix);
}
public Object logAOP(ProceedingJoinPoint joinpoint) throws Throwable {
String sign = joinpoint.getSignature().toShortString();
log("joinpoint : " + sign);
return joinpoint.proceed();
}
}public class Score {
private int korean;
private int math;
private int english;
// ...
public void getScore() {
System.out.println(korean + "/" + math + "/" + english);
}
} <context:property-placeholder location="classpath:app.properties"/>
<bean id="logger" class="com.dotori.util.Logger">
<property name="prefix" value="[PREFIX]" />
<property name="postfix" value="[POSTFIX]" />
</bean>
<aop:config>
<aop:aspect id="loggerAspect" ref="logger">
<aop:pointcut expression="within(com.dotori.school.*)" id="loggerPointcut" />
<aop:around method="logAOP" pointcut-ref="loggerPointcut"/>
</aop:aspect>
</aop:config>
<bean id="score" class="com.dotori.school.Score">
<property name="korean">
<value>${score.kor}</value>
</property>
<property name="math">
<value>${score.math}</value>
</property>
<property name="english">
<value>${score.eng}</value>
</property>
</bean>
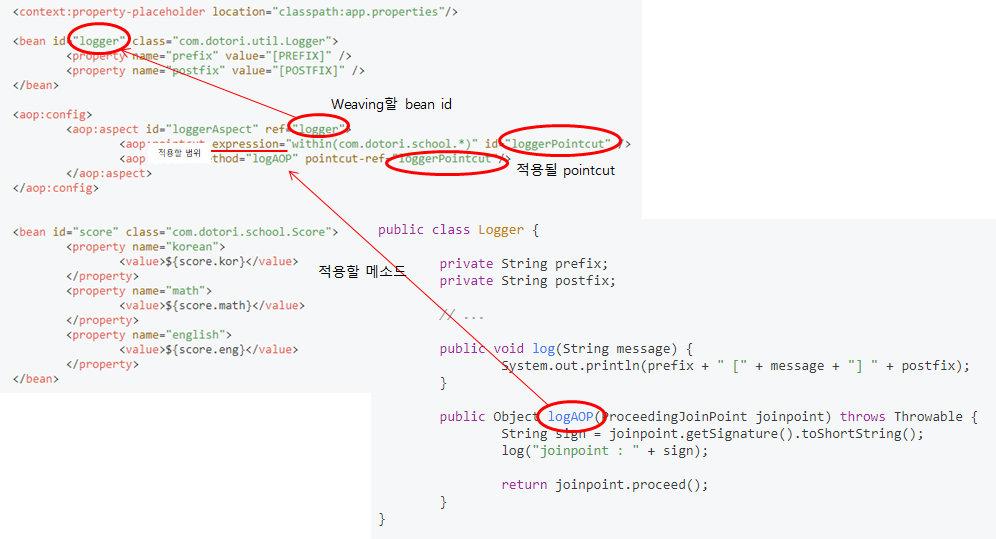
글로 설명하기엔 너무나도 복잡하다...

1. AOP를 사용하기 위해선 당연히 해당 class의 bean이 필요하다. (나는 logger라는 bean을 만들었다.)
2. aspect는 적용될 AOP가 있는 class의 bean을 참조한다 (나는 logger를 참조 시켰다.)
3. 모든 코어기능에 공통기능이 필여하지 않을 수 있다. 즉, 필요한 범위를 설정한다.(나는 com.dotori.school 이하 모든 클래스 및 메소드에 적용시켰다.)
4. pointcut에 적용할 메소드를 정의한다. (나는 logAOP 메소드를 적용시켰다.)
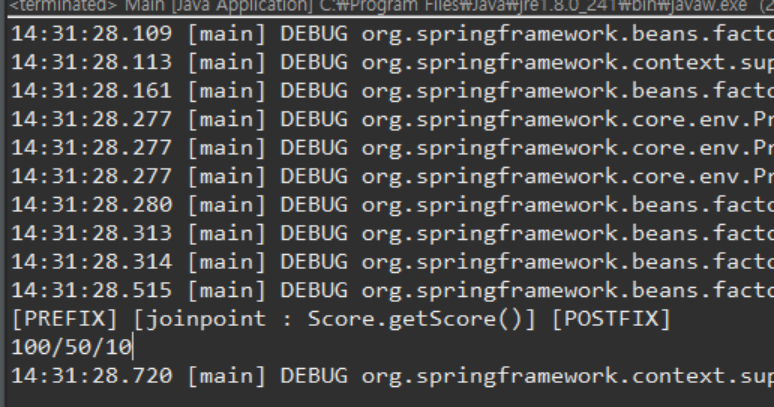
결과 화면을 보면 그림[AOP proxy 사용]이 어떠한 flow인지 바로 이해할 수 있다. AOP는 복잡하면서도 쉬우니 다시 한 번 공부하고 지나가자.
2. 어노테이션을 사용하여 AOP 구현
public static void main(String[] args) {
	String config = "classpath:appContext.xml";
	AbstractApplicationContext appContext = new GenericXmlApplicationContext(config);

	try {
		ScoreAnnotation score = appContext.getBean("score", ScoreAnnotation.class);
		score.getScore();

	} finally {
		if(null != appContext) {
			appContext.close();
		}
	}

}
@Aspect
public class LoggerAnnotation {
private String prefix;
private String postfix;
// ...
@Pointcut("within(com.dotori.school.*)")
private void pointcutlogger() {}
@Around("pointcutlogger()")
public Object logAOP(ProceedingJoinPoint joinpoint) throws Throwable {
String sign = joinpoint.getSignature().toShortString();
log("joinpoint : " + sign);
return joinpoint.proceed();
}
@Before("within(com.dotori.school.*)")
public void beforeAdvice() {
System.out.println("beforeAdvice start!!!");
}
} <context:property-placeholder location="classpath:app.properties"/>
<aop:aspectj-autoproxy />
<!-- ... -->
</bean>
xml을 사용 방식과 동일하다. 다만 xml에서 설정하는 방법을 어노테이션을 사용하여 나타낸 것 뿐.
단, xml에서 <aop:aspectj-autoproxy /> 태그를 추가해주어야한다. 왜냐하면 해당 태그가 있어야 spring이 @aspect 어노테이션을 찾아가기 때문이다.
잘 보면 @before 어노테이션은 xml에서는 등장하지 않았다. 다음과 같이 spring에서 지원해주는 advice 종류가 있다.
|
1. <aop:after> 태그, @After 어노테이션 - 메소드 실행 전 advice 실행 2. <aop:around> 태그, @Around 어노테이션 - 정상적으로 메소드 실행 후 advice 실행 3. <aop:after-throwing> 태그, @AfterThrowing 어노테이션 - 메소드 실행 중에 exception 발생 시 advice 실행 4. <aop:after-returning> 태그, @AfterReturning 어노테이션 - 메소드 실행 전/후 및 exception 발생 시 advice 실행 |
AspectJ pointcut 표현식도 따로 지원한다. 다음을 살펴보자.
|
1. Execution execution(public void get*(..)) - public void인 모든 get 메소드 execution(* com.dotori.util.*.*()) - com.dotori.util 패키지에 파라미터가 없는 모든 메소드 execution(* com.dotori.util..*.*()) - com.dotori.util패키지와 com.dotori.util 하위 패키지에 파라미터가 없는 모든 메소드 execution(* com.dotori.util.Logger.*()) - com.dotori.util.Logger의 모든 메소드
2. within within(com.dotori.util.*) - com.dotori.util 패키지 안에 있는 모든 메소드 within(com.dotori.util..*) - com.dotori.util 패키지와 com.dotori.util 하위 패키지 안에 있는 모든 메소드 within(com.dotori.util.Logger) - com.dotori.util.Logger의 모든 메소드
3. bean bean(Logger) - Logger bean에만 적용 bean(*er) = ~er로 끝나는 bean에만 적용
|
'Framework > spring' 카테고리의 다른 글
| #8 : Controller (1) | 2020.05.05 |
|---|---|
| #7 : MVC (Model View Controlle (0) | 2020.05.04 |
| #5 : bean setting (2) | 2020.05.02 |
| #4 : Bean Scope (0) | 2020.05.01 |
| #3 : Container Life Cycle (0) | 2020.05.01 |


