| 일 | 월 | 화 | 수 | 목 | 금 | 토 |
|---|---|---|---|---|---|---|
| 1 | 2 | 3 | 4 | 5 | 6 | |
| 7 | 8 | 9 | 10 | 11 | 12 | 13 |
| 14 | 15 | 16 | 17 | 18 | 19 | 20 |
| 21 | 22 | 23 | 24 | 25 | 26 | 27 |
| 28 | 29 | 30 | 31 |
- kotlin
- JPA
- 코딩
- 스프링
- database
- API
- 자바
- Elasticsearch
- cleancode
- Java
- 프레임워크
- Baekjoon
- 코딩테스트
- spring boot
- 읽기쉬운코드
- 그리디알고리즘
- 데이터베이스
- 애자일기법
- framework
- 백준
- 알고리즘
- ES
- 그리디
- 애자일프로그래밍
- 클린코드
- 개발
- 엘라스틱서치
- 코드
- Spring
- 개발자
- Today
- Total
튼튼발자 개발 성장기🏋️
#17 : H2 database 연동 준비 본문
최근 개인적으로 프로젝트 하느라 H2 데이터베이스를 연동해보았다. H2는 굉장히 생소했지만 테스트 용으로 많이들 사용하는 것 같다. "인메모리 데이터베이스"로 분류되어 있으며 용량이 작고 속도가 빠르다는 장점을 가지고 있다. 이 H2를 spring MVC에 연동하는 것이 굉장히 힘들었다. mySql이나 몽고와는 살짝 다른 건지.. 아니면 내가 spring을 공부하는 단계라서 그런건지 너무 어려웠다.
약 3일동안 삽질해서 연동을 해보았다. 가장 먼저 연동을위한 repository를 dependency 걸어주자. 참고로 나는 Gradle Build tool을 사용해서 maven을 사용한다면 pom.xml에 알맞은 버전을 걸어주면 된다.
dependencies {
	compile group: 'org.springframework.data', name: 'spring-data-jpa', version: '2.0.5.RELEASE'
	compile group: 'org.hibernate', name: 'hibernate-entitymanager', version: '5.4.10.Final'
	compile group: 'commons-dbcp', name: 'commons-dbcp', version: '1.4'
	compile group: 'org.hibernate', name: 'hibernate-core', version: '5.4.1.Final'
	testCompile group: 'com.h2database', name: 'h2', version: '1.4.197'
	compile group: 'org.springframework', name: 'spring-jdbc', version: '5.1.3.RELEASE'

    // ...
}
자. H2 database를 다운 받자. Zip으로 받아도 되고 install 형으로 받아도 무방하다.
Downloads
Downloads Version 1.4.200 (2019-10-14) Windows Installer (SHA1 checksum: 12710a463318cf23c0e0e3f7d58a0f232bd39cfe) Platform-Independent Zip (SHA1 checksum: 5898966bbca0b29ee02602fb84e0eb90ec92eec2) Version 1.4.199 (2019-03-13), Last Stable Windows Installe
www.h2database.com
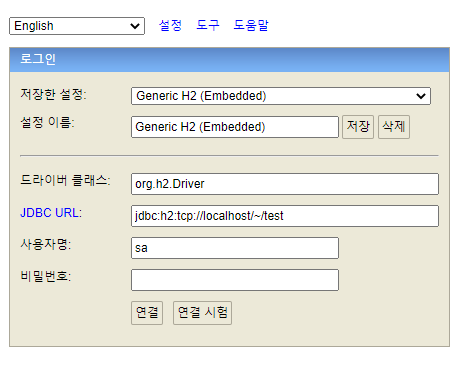
실행하면 다음과 같은 창이 뜰텐데 드라이버 클래스와 JDBC URL을 잘 봐놓자. 연결을 클릭하는 순간 바로 디비 접속을 할 수 이따.


이제 준비를 마쳤다. 이제 Spring에서 JPA를 통해 DB 자동생성과 데이터 삽입 및 삭제 등을 가지고 데이터를 조물락거려보자.
다시 STS로 돌아와서, H2 설정을 마저 해주자.
	<bean id="dataSource" class="org.apache.commons.dbcp.BasicDataSource">
		<property name="driverClassName" value="org.h2.Driver" />
		<property name="url" value="jdbc:h2:tcp://localhost/~/test" />
		<property name="username" value="sa" />
		<property name="password" value="" />
	</bean>

	<bean id="jdbcTemplate" class="org.springframework.jdbc.core.JdbcTemplate">
		<property name="dataSource" ref="dataSource"></property>
	</bean>

	<bean id="entityManagerFactory" class="org.springframework.orm.jpa.LocalContainerEntityManagerFactoryBean">
		<property name="packagesToScan" value="com.dotori.h2test.model" />
		<property name="dataSource" ref="dataSource" />
		<property name="jpaProperties">
			<props>
				<prop key="hibernate.show_sql">true</prop>
				<prop key="hibernate.hbm2ddl.auto">create</prop>
				<prop key="hibernate.dialect">org.hibernate.dialect.H2Dialect</prop>
				<prop key="hibernate.format_sql">true</prop>
				<prop key="hibernate.use_sql_comments">true</prop>
				<prop key="hibernate.id.new_generator_mappings">true</prop>
			</props>
		</property>

		<property name="persistenceProvider">
			<bean class="org.hibernate.jpa.HibernatePersistenceProvider"></bean>
		</property>

	</bean>

	<context:annotation-config />

	<jpa:repositories base-package="com.dotori.h2test.repository" entity-manager-factory-ref="entityManagerFactory" />

	<bean id="transactionManager" class="org.springframework.orm.jpa.JpaTransactionManager">
		<property name="entityManagerFactory" ref="entityManagerFactory" />
	</bean>

	<tx:annotation-driven transaction-manager="transactionManager" />
1. dataSource bean은 org.apache.commons.dbcp.BasicDataSource class를 사용하고 있고 property로 아까 잘 봐놨던 드라이버 클래스와, JDBC URL, username, password가 있다. 이걸로 연동이 될 줄 알았지만 호락호락하지 않았다.
2. org.springframework.jdbc.core.JdbcTemplate class로 JdbcTemplate bean을 만들어주되, 앞에 만들었던 dataSource를 참조시킨다. 이 JdbcTemplate도 잘 봐놓자.
3. entityManagerFactory bean를 생성해야 하는데, 여기부터 20시간 정도 소요되었다. 바로 spring 버전별 지원 여부에 따라서 연동 방법이 달라진다는 것. 상기 내용처럼 entityManagerFactory는 spring 5.x 버전 이상 설정해야한다. 그렇지 않다면 spring 버전에 따라 연동 방식을 공부해야하겠지만, 쉽지 않다...
4. jpa:repositories tag를 통해 본인의 repository의 base package 명과 entityManagerFactory를 설정한다.
5. DB에 접근하여 데이터를 조물딱거리려면 transaction manager가 필요하다. 이것을 org.springframework.orm.jpa.JpaTransactionManager class를 사용했다.
이제 설정은 끝났다. 이제 코드를 작성해보자.
import javax.persistence.Column;
import javax.persistence.Entity;
import javax.persistence.Id;
import javax.persistence.Table;

import lombok.Data;

@Entity
@Data
@Table(name = "DBTEST")
public class TableEntity {

	@Id
	@Column(nullable = false, length = 20, unique = true)
	private String id;

	@Column(nullable = true, length = 20)
	private String originalId;

	@Column(nullable = false, length = 10)
	private String command;

	@Column(nullable = false, length = 10)
	private long amount;


	public TableEntity() {
	}

	public TableEntity(String id, String originalId, String command, long amount) {
		this.id = id;
		this.originalId = originalId;
		this.command = command;
		this.amount = amount;
	}

}
이 코드를 실행시키면 H2에 자동으로 PK로 id를 가진 "DBTEST"라는 테이블이 생성될 것이고, getter와 setter도 생성 될 것이다.
create table DBTEST (
	id varchar(20) not null,
	amount bigint not null,
	command varchar(10) not null,
	originalId varchar(20),
	primary key (id)
)
@Table 어노테이션은 name으로 설정된 이름으로 테이블을 생성해주고, 각각 @column 어노테이션으로 설정된 녀석을로 컬럼을 채워준다. @Data 어노테이션은 해당 class의 모든 변수들의 getter와 setter를 생성해준다. 이 녀석은 lombok이라고 하는 라이브러리를 사용하는데, 사용 방법은 다음 시간에 해보겠다.
이제 JPA를 통해 디비접근을 해보자. 만약 이전 글을 읽었거나, JPA docs를 읽었다면 해당 내용은 잘 알 것이다.
import org.springframework.data.jpa.repository.JpaRepository;
import com.dotori.h2test.model.TableEntity;

public interface CardRepository extends JpaRepository<TableEntity, String> {
	TableEntity findByTxId(String txId);
	TableEntity findByOriginaltxId(String originaltxId);
}
'Framework > spring' 카테고리의 다른 글
| 클라우드 네이티브 배치 (0) | 2022.09.21 |
|---|---|
| #18 : Lombok (1) | 2020.07.22 |
| #16 : query method를 정의하자 (1) | 2020.05.24 |
| #15 : 상속 없이 repository를 만들자 (0) | 2020.05.24 |
| #14 : JPA 시작 (0) | 2020.05.18 |


